Overview
This is a quick guide for staff on RezExpert and daily procedures.
Logging into RezExpert
Each employee can have their own unique log in.
All transactions and payments made by the employees will be recorded against their name, with the Date & Time transacted.
The username is in the lower case. RezExpert will automatically convert any capital letters into lower case when entering the Username.
RezExpert has a Training system URL and the LIVE system URL.
Use the Training system for training new staff.
Live System: online.rezexpert.com
Training System: profile.rezexpert.com
The live System is your real-time Availability Grid.
The Training System is always available for training staff and practicing new features and procedures.
Your manager will provide you with your Username and Password details to log into RezExpert.
Recovering your Password
If you lose or forget your password, you are able to recover your password from the Log in Screen.
Click the Forgot Password? Link.
You will be sent a Password Recovery email to reset your password.
Password Requirements
Your password must be at least 8 characters long and also meet at least three of the four following required criteria:
- Must contain at least 1 lower case “a”
- Must contain at least 1 upper case “A”
- Must contain at least 1 digit “2”
- Must contain at least 1 symbol “$”
RezExpert Layout
After logging in, you will arrive at the Grid screen.
All of your bookings will be displayed on the Availability Grid for the date range displaying.
Default Date Range: Three (3) days prior to Today, Today’s Date and future dates.
The amount of future dates displaying depends on the screen size and the browser zoom setting.
For example, a higher zoom, i.e. 200%, will display fewer future dates than the normal zoom, i.e. 100%.
TIP: If the Availability Grid squares are looking too small for you, you can increase the zoom on the internet browser page.
Click on the internet browser settings icon on the top right corner of the internet page to select a higher zoom.
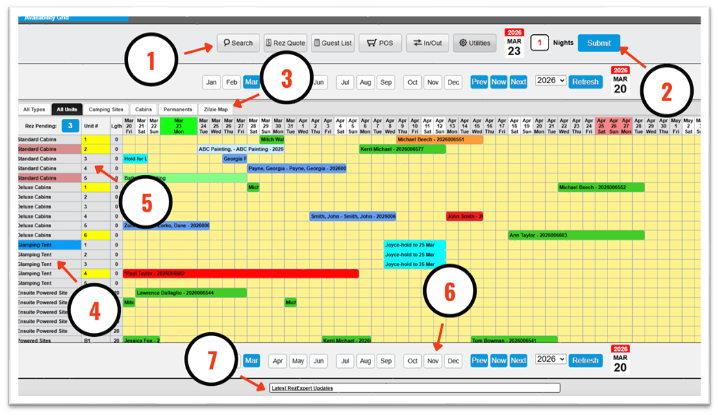
- 1 Function Buttons – Search, Rez Quote, Guest List, POS, In/Out, Utilities
- 2 Submit Button – Calendar Quote Tool
- 3 Custom View tabs – showing unit types
- 4 Unit Types – click to view any Booking Conflicts
- 5 Units #s – click to view any Upcoming Reservations and Pencil Ins assigned to the selected unit
- 6 Date Footer – click on a month to quickly jump to that month on the Grid. (Also displayed above the Grid).
- 7 RSS Feed – click to read all the new features introduced into RezExpert.
Menu button
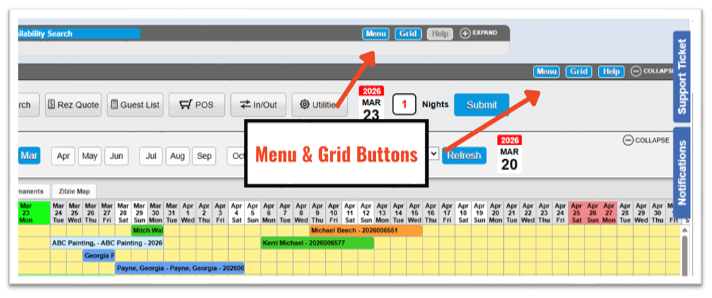
On the top right of the Availability Grid and on each panel within RezExpert, there is a Menu button.
Any of these Menu buttons will allow you to navigate through the RezExpert system.
Your employee security role may limit the options displayed within the Menu Navigation box.
Use the Search tab to quickly search and locate the area or report you require.
You can also access the different areas within RezExpert using the Menu Bar at the top of the page.
Grid button
On the top of each panel and setup area within RezExpert, there is also a Grid button next to the Menu button. This will direct you back to the Availability Grid.
Menu bar
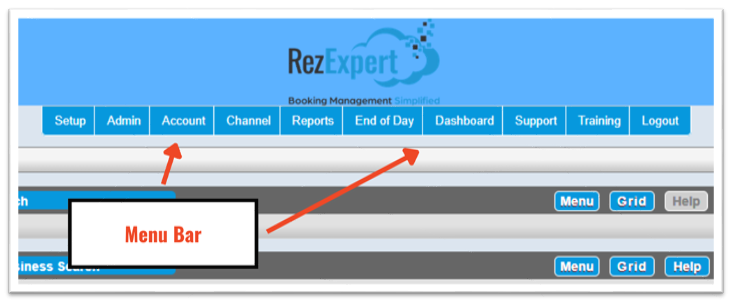
The Menu bar at the top of the Availability Grid page will allow you to select the area that you wish to navigate to.
Clicking Setup, Admin and Reports will direct you to that tab of the Menu navigation box.
If any buttons are not appearing within your Menu bar display, your Employee Security Role doesn’t have permission to access these areas of your RezExpert system.
Availability Grid
The Availability Grid will contain all of the unit types, units, and bookings.
By default, you will see the past three (3) days and then Today’s date as a wider column and highlighted as green.
The dates will run across the top of the Availability Grid; the weekends are highlighted as white.
Any Major Holiday Events setup will display the dates as a pink colour.
Unit Type(s) will display on the left, with their allocated units beside.
(Circle 4 and 5 on the above image.)
Across the top of the Availability Grid will be Grid View tabs.
All Unit Types tab will display the number (#) of units available for the date range displaying.
All Units tab will display the individual units for the date range and the bookings associated.
(Circle 3 on the above image.)
Any custom Grid View tabs will also display along the top of the Availability Grid, in their set order of appearance.
The date footer at the top and bottom of the Availability Grid will allow you to quickly move to a new date.
Click on a month to be directed to the 1st of that month.
The year dropdown will allow you to change to a different year for the displaying month.
The Calendar on the far right (that is displaying as 3 days prior to today‘s date) will allow you to select the specific date that you want the Availability Grid to move to.
The Prev button will display the previous 7 days, on the left.
The Next button will display the next 7 days on the right.
The Now button will line today’s date up with the units on the left.
The Refresh button will refresh the Availability Grid to the default display (previous 3 days and then today’s date).
(Circle 6 on the above image.)
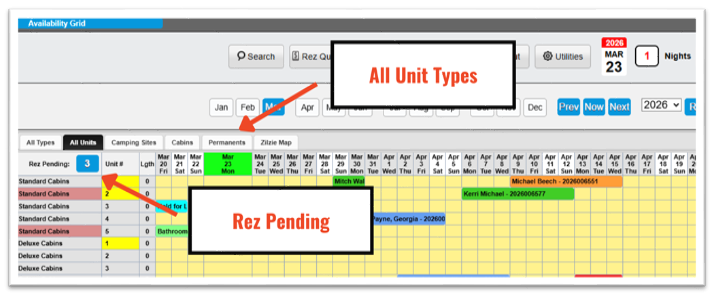
Rez Pending number
The Rez Pending number indicates the number of bookings that have been requested to pay a deposit policy but have not paid any deposit.
Clicking on this icon will direct you to the Pending tab within the Arrivals/Departures tab.
You can select a booking and click the Payment button to apply a deposit payment or Guest Folio to open the Guest Folio.
Availability Grid FAQs
Question: Can I create my own Grid View tabs or change the ones displaying?
Answer: Grid View tabs can be created and edited at any time by clicking the Utilities button.
Click Go next to Grid View Setup to be directed to the Grid View Setup.
Question: Can I change the colours of the Availability Grid?
Answer: You have control over many aspects of the Availability Grid colour scheme.
The reservation colours and unit status colours can be changed in Theme Editor.
The yellow background and the date colours cannot be changed.
Question: Why are some units displayed as Red or Yellow?
Answer: Yellow indicates there is a booking currently checked in for that unit.
Red indicates that the room has been marked as Dirty and requires cleaning.
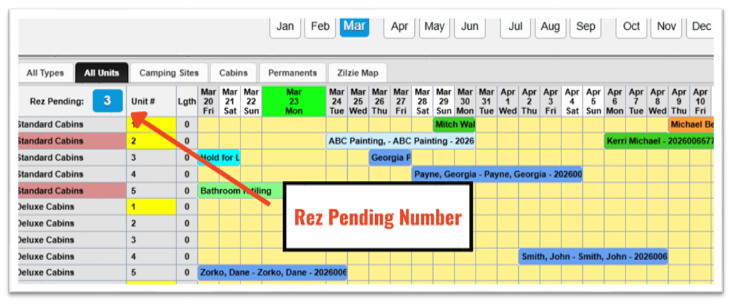
Function Buttons
Search Button
The Search button will allow you to search for any Client Record, Reservation, Invoice or Vehicle information.
Any Custom Fields that have been set to be Searchable will also within the Search box.
The Search box is broken into two tabs, Persons and Businesses.
This allows you to search for Person/Client records and Business/Corporate/Wholesale/Travel Agent records.
The left side of the tab is Client/Member Details search fields; the right side of the tab is Reservation#, Confirmation#, Invoice and Vehicle information search fields.
The right side of the tab requires the exact search data/information to be entered in order for the system to display search results.
The left side of the tab (Client/Member Details) doesn’t require the exact search information to be entered.
Any Part of Field Flag: This flag will allow you to widen the search criteria of the Client Details to search for any part of that field.
Client Name searches by Last Name; however, you can search by First Name by selecting the Any Part of Field flag.
NOTE: Any Part of Field flag is only available for the Client Details and Custom Fields search fields.
Rez Quote Button
The Rez Quote button is a quick way to get a quote for selected dates and unit type.
Click on the required Check In date and unit on the Availability Grid and drag out for the number of nights required.
Click Rez Quote. A quote till tape will appear, displaying the Base Rates for the selection.
If the quote needs to confirmed and made into a booking, click New Booking. You will be directed to the Guest Folio.
Enter the number of guests into the Occupants section and the client record to proceed with the booking.
Guest List Button
The Guest List button will display today’s guest list and occupant breakdown.
You can access a booking’s Guest Folio; export/print reports.
You can select other dates from the top of the Availability Grid and click Guest List to view the guest list for the selected dates. (When the dates are selected, they will change from grey/white to purple.)
POS Button
The POS (Point of Sale) button will allow you to process any over the counter Sale/POS transactions not related to a booking. I.e. Gas bottle refill, ice, firewood etc...
In/Out Button
The In/Out button will direct you to the Arrivals/Departures panel, defaulting to the Arrivals tab
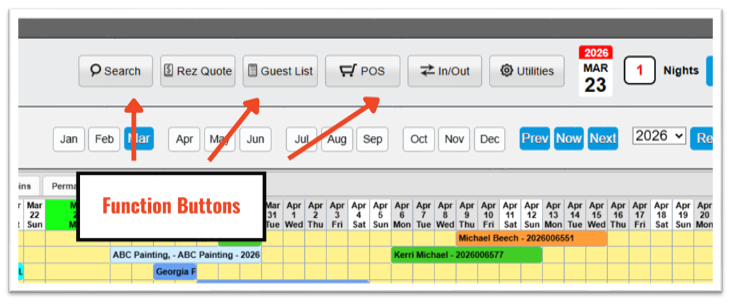
Using RezExpert
How to make a Booking
The easiest way to make a booking on the Availability Grid is to select the dates and the required unit on the Grid and press Submit.
- If the dates of the booking are not visible on the Grid, click on the required month on the Date Footer to move the Grid.
- Click on the yellow square for the required arrival date and unit (type) on the Grid; the square will change colour to purple.
- Drag the mouse out for the required nights.
- Click the Submit button on the top right of the Availability Grid.
- The Booking Quote screen will appear.
- Enter in the number of guests within the Occupants section at the bottom.
- If the booking is assigned to a Length sensitive unit, the Vehicle information and dimensions will need to be entered.
- Review the details of the selected booking and click Submit.
- You will now be directed to the Guest Folio.
- If it is a Returning Guest, click Client Search to search for the client’s last name.
- If it is a New Client, click New Client to enter the client’s details.
- Ensure all details of the booking are correct and click Submit.
- If a deposit policy is requested, you will be directed straight to the Charges/Payments tab to process through the payment.
After successful payment, the Print Selector box will appear to send any required emails.
- If no deposit policy is requested, the Print Selector box will appear to send any required emails.
- Click on the Grid button (top right of the panel) to return to the Grid.
How to make a Booking FAQs
Question: Can I change the booking while I’m making it?
Answer: Yes, you don’t need to go back to the Availability Grid to make any changes to the booking. You can adjust many aspects of the booking within both the Booking Quote screen and also the Guest Folio button.
Question: What do I do if I select the wrong client record?
Answer: Prior to clicking Submit, you can click Clear Client button at the bottom of the Client Details. This will clear out the assigned client record.
If the Submit button has already been pressed, you cannot assign a different client. You will need to cancel this booking and remake the booking under the correct client’s name.
How to make a Group Booking
Group bookings can be made directly onto the Availability Grid, using the same way when making a single reservation.
- Select the date of arrival for the 1st required unit and drag out for the number of nights
- Drag down the mouse for the number of required units, if they are all sitting next to each other on the Availability Grid.
If some of the required units are not next to each other on the Availability Grid, select as many as you can and you can add the other units in the Booking Quote screen.
- Click Submit.
- Within the Booking Quote Screen, the Till Tape on the left will display all of the selected units as separate bookings.
- If you need to add in additional units and/or unit types, adjusted the Value to the required number of units and click Update. These additional units/bookings will be added onto the list in the Till Tape.
- Any adjustments to the Group Booking’s Rate Group, Discount, Check In/Out dates can be made at the Group Booking Summary and will apply to all bookings within the group.
- If any booking requires any of these different to the Group Booking Summary settings (for example different check in and check out dates), click on the booking within the listing on the left to make the adjustments. It will only apply to this booking.
- Click on Booking #1, select the number of Occupants within the Occupants section at the bottom.
- A message box will appear asking if you want to copy this occupant value to all of the bookings.
Click Yes to copy that value to all bookings.
Click No to apply the occupant numbers to each booking.
If most of the bookings have the same, click Yes on the first pop up.
On the booking(s) that is different, change the occupant value and click No. This will ensure just this booking has that occupant value.
- If any bookings are assigned to Length sensitive unit, the Vehicle information and dimensions will need to be entered.
- Click Submit.
- You will now be directed to the Guest Folio.
- Assign the Client Record to the Group Booking Summary Level.
If it is a Returning Guest, click Client Search to search for the client’s last name.
If it is a New Client, click New Client to enter the client’s details.
- Ensure all details of the bookings are correct and click Submit.
- If a deposit policy is requested, you will be directed straight to the Charges/Payments tab to process through the payment.
After successful payment, the Print Selector box will appear to send any required emails.
- If no deposit policy is requested, the Print Selector box will appear to send any required emails.
- Click on the Grid button (top right of the panel) to return to the Grid.
Group Booking Information
Single Client/Single Account and Single Client/Multi Account
- Single Client/Single Account: Group Booking Summary Client is responsible for all the Payments. All the Reservation Charges will remain at the Group Booking Summary - Charges/Payments tab; each individual bookings will not have reservation charges displaying in the Charges/Payments tab.
- Single Client/Multi Account: Each booking Client is responsible for the payment of their booking. The Reservation Charges will display on each individual booking's Charges/Payments tab; no charges will display at the Group Booking Summary level.
Note: The setting can not be adjusted if any deposits have converted. The setting can be adjusted at any time prior to Check In on unpaid group bookings. After any reservation, within the group, has been checked in, the setting can not be adjusted.
How to make a Group Booking FAQs
Question: I can't click Submit in the Booking Quote screen for my Group Booking?
Answer: One of the bookings within the Group is missing Occupant or Vehicle information.
On the top of the Till Tape, click on the Units tab to view the individual information of each booking. Select the booking that is missing information to apply. Once all bookings have the mandatory information, the Submit button will appear.
Question: Do I have to assign a client record to each booking within the Group?
Answer: Only if you want to record the client associated with each booking. RezExpert requires a client record for the Group Booking Summary level. The individual bookings’ Client Details section can be left blank, or a client record assigned to the booking.
Question: Why is the Group Booking displaying two names on each booking?
Answer: The Availability Grid will display the Reservation Label as “Booking Client Name – Group Booking Summary Level Client Name”.
If there is only the Group Booking Summary Level client recorded entered and no clients on the individual bookings, the Group Booking client name will display twice.
Question: How do I handle when each customer wants to pay for their own booking within the Group booking?
Answer: Prior to Check In and any payments being applied to any of the bookings, you can change the Single Client/Single Account setting to Single Client/Multi Account. This will ensure that each booking’s Charges/Payments tab is displaying that booking’s reservation charges and payments.
If a booking has been checked in or a payment has been applied to a booking, ensure that all remaining payments are allocated to the specific bookings when they are posted to the Group Booking Summary level. An Allocate box will pop up allowing you to select the required booking(s) to allocate the payment to.
Question: Can I send individual booking emails and receipts to the customers?
Answer: You can click the Print Other or Print Statement within any booking in a Group booking, and the Print Selector box will display that reservation content.
You can select the required content or documentation to send to the booking’s client or the Group Booking client.
Booking Quote Screen
The Booking Quote Screen will display all the details of the booking quote.
There are three tabs within the Booking Quote screen, that can be used to ‘build’ all aspects of the booking, for example Client’s name, any additional products etc. These can also be added within the Guest Folio after the booking has been made.
- Reservations: Booking details
- Products/Services: Ability to add any additional products/services to the booking quote
- Client Details: Client information.
Reservations Tab:
On the left side is the Quote Summary, outlining the reservation and charges details of the booking quote; on the right side is the booking details.
Assign Unit button will allow you to assign a unit to the booking. Only available units for the selected dates will display in the listing. This button will display after a Unit Type has been selected.
Rate Group: Regular will be the default rate group - click on the dropdown to select another rate group to apply to the booking.
Discount: A discount (or surcharge) can be applied to the booking – click on the dropdown to select the required discount.
Check In: The arrival date of the booking. Click on the date to adjust if required. The dates on the calendar that are displayed as yellow indicate the nights.
Check Out: The departure date of the booking. Click on the date to adjust if required.
Unit Types with the number of units available for the date range selected.
Avail: Indicates the # of units available.
Ext: Indicates the number of nights you can extend the reservation for before you run out of availability – useful if the guest wishes to change the length of stay.
Occ: Indicates the maximum number of occupants for the Unit Type.
Min/Max Rate: These columns indicate the minimum and maximum daily rate for the date range; if there was a rate change during these dates, it will display in these columns.
Occupants: Select the occupant numbers of the booking.
Only the occupant types allowed within the selected Unit Type will display as an option.
Within the dropdown, the maximum number allowed of that occupant type will display.
Once dates, unit type(s) and occupant(s) have been selected, the Submit button will display.
Click Submit to submit the booking quote and be directed to the Guest Folio.
Product/Services Tab:
The Products/Services tab will allow you to add on any additional Products to the booking quote.
Client Details Tab:
The Client Details tab will allow you to search for client record or add a new Client record.
Booking Quote FAQs
Question: Why isn’t the Submit button displaying?
Answer:
- Ensure that Occupants have been assigned to all bookings. Click on the Unit tab on the top left to view each bookings’ details.
- If you require Vehicle information or have length sensitive sites, ensure the required information recorded.
- If it is a Group booking, each booking must have Occupants entered.
If each booking is on a length sensitive site, each booking will also require vehicle information entered.
Question: Can I change Unit Type without needing to go back to the Grid?
Answer: Yes. Next to the current unit type change the value from 1 to 0 and click Update. Next to the required unit type, change the value from 0 to 1 and click Update.
Question: What if I forget to change something in the Booking Quote before clicking Submit?
Answer: Any aspect of the booking details can be adjusted after you are directed to the Guest Folio; prior to clicking on the Submit button within the Guest Folio, you can clear out the selected Client record and make any adjustments required to the booking quote before finalising the booking.
Phone Enquiries
Scenario Example: When you receive a phone enquiring about Availability for a particular time of the year and/or length of time.
The Calendar Quote tool best helps you with this scenario as all Unit Types and their availability for the selected time entered will be displayed.
- Click on the calendar to select the date of arrival on the Calendar.
- Enter the number of nights that the customer wishes to stay for.
- Click Submit.
- The Booking Quote Screen will pop up.
- Enter in the number of units required next to the required Unit type.
- Enter the Occupant numbers for each booking.
- Click Submit to create the booking.
- The Guest Folio will display to enter in the client details and confirm the reservation.
Phone Enquiries FAQs
Do I need to move to those dates on the Grid before I use the Calendar Quote Tool?
No. You can see all of the available unit types after you have selected the Arrival dates, number of numbers and clicked Submit. The Booking Quote screen will display how many of each type is available; after you have selected a unit type, you will be able to see which units are available.
Booking Guest Folio
The Guest Folio holds all the information about the booking - Client Details, dates, payments etc.
To access the Guest Folio for a client, click on a customer's booking within the Availability Grid. On the left hand side the Select Reservation tab will drop down showing Rez Details. Click on the Guest Folio button.
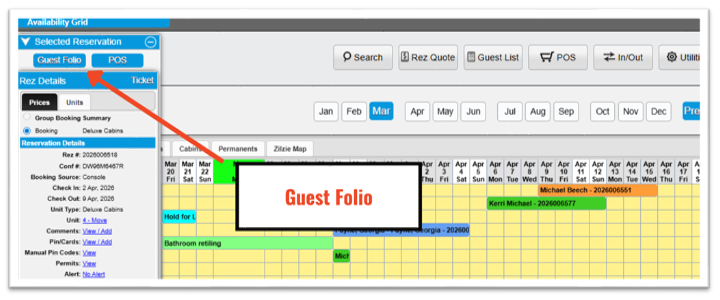
The Guest Folio is broken into three tabs:
- Rez Details
- Charges/Payments
- History
Rez Details
Contains all the client information and booking details.
Charges/Payments tab
The Charges/Payments tab contains the booking charges and payments.
History tab
The History tab contains all the booking history.
Print Other & Print Stmt Button
The Print Other and Print Stmt Button will allow you to print receipts, statements and send emails to customers.
If SMS functionality has been enabled, you can also send SMS messages to the client via these buttons.
Rez Details tab
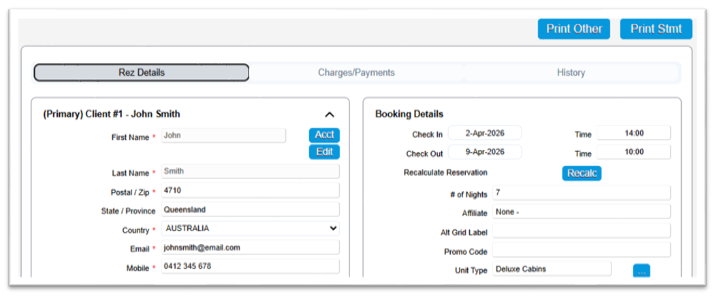
The Rez Details tab displays the Client details on the left and the Booking Details on the right.
Any mandatory client or custom fields will display a * next to the field label.
Contact details for the client such as Address, Email, Mobile etc can be edited within any booking, at any stage.
These can also be edited by clicking on the Edit button next to the client’s First Name.
Any Custom Fields created will also display within their section.
Client custom field data will be recorded within the Client’s Record and will display on every booking for the customer.
Rez custom field data will be recorded on that particular booking only.
Charges/Payments tab
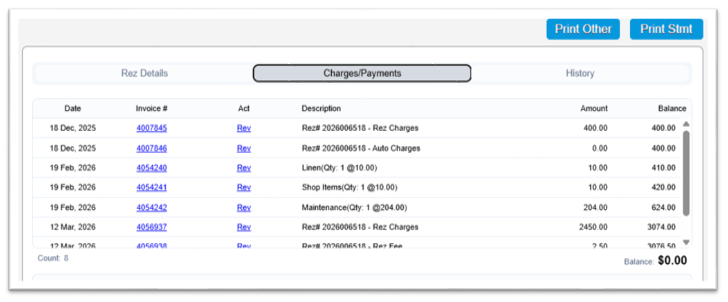
All of the reservation’s charges and payments will display.
The Charges will display in descending order of oldest to newest; by date.
The payment options will display as buttons on the right-hand side.
If the business isn’t connected to a Payment Gateway, the button will be Payment. *
This will allow operators to apply the payment to the booking or sale, using the payment type selected.
If the business accepts credit card payments via a Payment Gateway, there will be a button with the Payment Gateway name.
* Throughout this guide, this button can also be referred to as Other Payment button, instead of Payment button.
The button label changes from Payment to Othe Payment when a credit card processor is connected to RezExpert.
Credit Card On Record Yes/No: This will indicate if you are securing storing the customer’s credit card. You will be able to charge this encrypted credit card token for future payments/charges etc.
Unresolved Payment Transaction
Unresolved Payment Transaction: If there is a red link displaying Unresolved Payment Transaction, this indicates that there was an issue when the customer was paying online.
This could be caused by a number of different factors such as the customer closing down the payment screen, the internet dropped out, or the communication from the payment gateway processor to RezExpert was not completed.
It is important that you review your payment gateway Online Portal account to verify if the payment was successful or failed. After reviewing the payment gateway portal, you can click on the Unresolved Payment Trans link. This will direct you to the Payment Gateway Manager; select the transaction and click Resolve. This indicates that you have reviewed the transaction.
If the payment was successful within the payment gateway, you can apply the payment to the booking using the Other Payment button. Select the credit card type used, enter the amount paid and click Post and Submit to finalise.
History tab
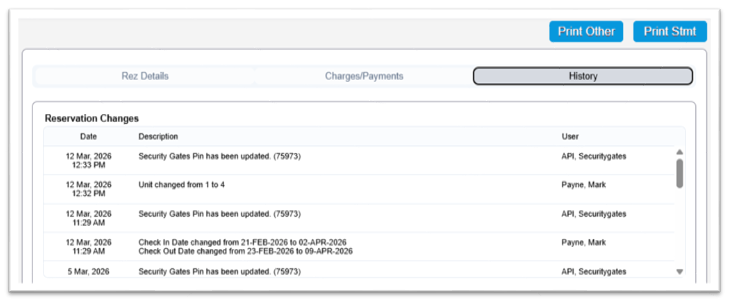
All of the booking history is automatically recorded within the History tab; such as who/when it was made, any changes to the bookings, any emails sent out of the Guest Folio.
For example: When an operator changes the dates of the booking, all of the changes are automatically recorded in the History tab.
Reservation Charges that have been reversed off will be displayed in the History tab.
Print Other/Print Statement Buttons
The Print Other and Print Statement buttons will allow you to email and SMS emails, receipts, etc. to the customer.
Send Manual Email Communication
The Send Manual Email Communication option will display at the top of the Print Other and Print Statement buttons.
It can be used to compose and send a custom email with or without attachment(s) directly to customer; saving you the task of downloading the required attachments and sending out an email from your regular email provider.
After selecting this option:
- Enter the Subject Line and text within the Email body
- Tick on any required attachments
- Select the required email address (if the client has a Secondary Email)
- Click Email.
The email and any attachment(s) will be sent to the email address.
Print Other
The Print Other button is available for selection any time prior to Check Out; the content that is available to display can be tailored to the different reservation statuses.
For example:
- Booking Status: Confirmed – all confirmation email and information can display
- Booking Status: Checked In – all Checked In email and information can display; this may be different to the Confirmation information.
- Booking Status: Cancelled – only cancellation information will display.
Print Statement
The Print Statement button is available at any stage of the booking, even after the booking has been checked out.
TIP: To make any adjustments to any of the content in the Print Other or Print Statement buttons, these can be made in Content Assignment Setup.
For single reservations: Select Console > Regular Reservation HTML.
For group reservations: Select Console > Shopping Cart HTML.
Global Documents
Any documents that have been uploaded into the Global Document button/library in Inventory Setup or Document Manager will display in the Global Documents section.
You can select documents to be attached to the email as a hyperlink for the customer to click on.
Any documents set to Auto Assign to Confirmation Emails will automatically be enabled.
The hyperlink will be displayed within the email as Click here to view the Global Document Name.
Unit Type Documents
Any documents that have been uploaded into the Document button for Unit Types in Inventory Setup > Unit Types tab or Document Manager will display in the Unit Type Documents section.
These documents will only display when the booking (or a booking within a Group booking) has booked that Unit Type.
You can select documents to be attached to the email as a hyperlink for the customer to click on.
The hyperlink will be displayed within the email as Click here to view the Unit Type Document Name.
Unit Documents
Any documents that have been uploaded into the Document button for Unit in Inventory Setup > Units tab or Document Manager will display in the Unit Type Documents section.
These documents will only display when the booking (or a booking within a Group booking) has been assigned to that Unit.
You can select documents to be attached to the email as a hyperlink for the customer to click on.
The hyperlink will be displayed within the email as Click here to view the Unit Document Name.
Print Other/Print Statement Buttons FAQs
Question: When sending an email, can I unselect a receipt or document that is automatically ticked on?
Answer: Yes, you can untick any automatically selected content or documents.
Question: Can I still send a receipt to a customer after they have checked out?
Answer: Yes, you can use the Print Statement button to send any required content or document to the customer.
If the usual Statement Email isn’t the required body of text, you can select the Send Manual Email Communication to compose your own email body and attach the required content, etc.
Till Tape
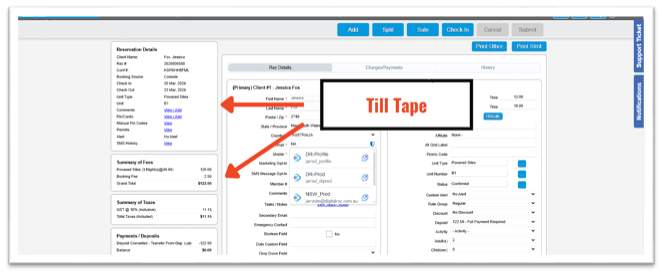
The Till Tape will allow you to view the reservations details and Documents in the Guest Folio.
You can also view and access the Till Tape when left clicking on the booking on the Grid.
When you left click on a booking on the Availability Grid, the Till Tape will automatically display on the left.
Clicking on the Unit link will allow you to assign/change the unit assigned to the booking. When clicked, only the available units for that date range will be available for selection.
You can read or add any Comments onto the booking by clicking on the Comments link.
Any Alerts can be assigned to the booking; when assigned, the Alerts line will display as the associated alert colour for easy identification.
There is also an option to quickly email the customer by clicking on the email address link.
NOTE: This is not sending an email via RezExpert; your email provider configured on your computer will be sending the email.
Reservation Management
When reservations are on the Availability Grid, you can easily open and manage the booking using the right click button on the mouse. This will open the quick reservation menu to quickly handle any processes.
On the Availability Grid, select the reservation using the right-hand button on the mouse or pad.
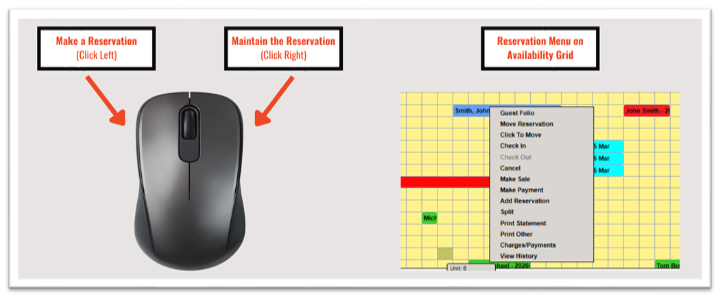
The Right Click menu will appear with the following options:
- Guest Folio – opens the reservation’s Guest Folio
- Move Reservation – opens the Available Units box to select a new site/unit
- Click To Move - allows you to select the vacant unit on the Availability Grid to move the reservation to.
- Check In – opens the Rez Status box to check in. Available on reservations due to check in – past their check in date.
- Check Out – opens the Rez Status box to check out reservation. Only available on Checked in Reservations past their Check out date.
- Cancel – opens the Rez Status box to cancel the reservation.
- Make Sale – opens the New Sale/Quote screen to process through a sale.
- Make Payment – opens the Charges/Payments tab to process through a payment.
- Add Reservation – add another reservation to the selected reservation to create into a group.
- Split – splits the reservation into two for relocation.
- Print Statement – opens the Print Statement print selector screen to print/email a Reservation Statement Summary/Detail.
- Print Other – opens the Print Other print selector screen to print/email a Tax Invoice/Receipt, Check in form etc.
- Charges/Payments – opens the Charges/Payments tab.
- View History – opens the History tab of the Guest Folio.
Upcoming Bookings and Pencil Ins
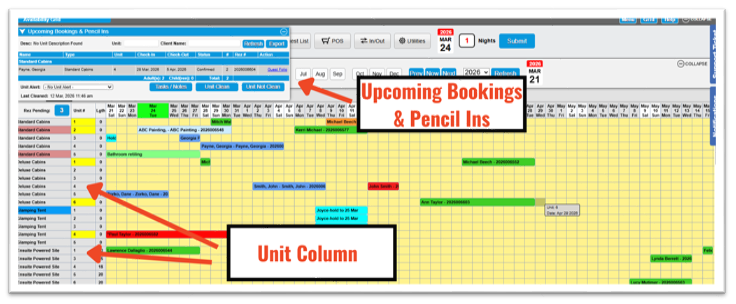
Clicking on any of the Units within the Unit column on the left of the Availability Grid, will display the Upcoming Bookings and Pencil Ins box. All bookings assigned to the selected unit for the date range displaying will display.
To open any of the bookings, click on the Guest Folio link to be directed to the booking’s Guest Folio.
Booking Conflicts
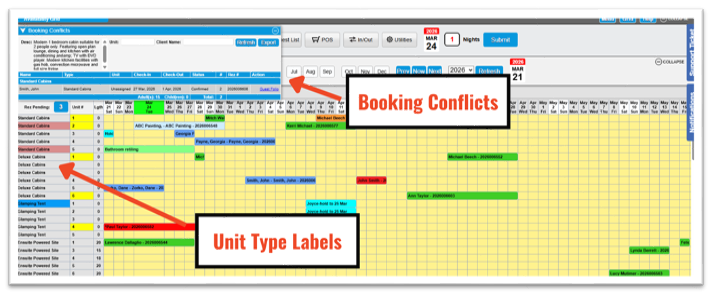
Clicking on any of the Unit Type labels on the left will display the Booking Conflicts box at the top left.
If any bookings are displaying within this box, they are a booking conflict and you don’t have one (1) available unit for their whole length of stay.
These bookings will not be showing on the Availability Grid, as there isn’t an unit available for the booking to display on.
You will always find these bookings within the Arrivals/Departures panel and the Reservation Manager panel.
To handle booking conflicts, click on the Guest Folio link to be directed to the booking’s Guest Folio.
Depending on the scenario you have different options available:
- Split the booking across available units if the customer has agreed to move during their stay;
- Move the booking to another Unit Type that does have one (1) available unit for the whole length of stay;
- Cancel the booking if there is no other alternative to accommodate the customer’s booking.
Making a Payment
Right click on the booking and select Make Payment.
Alternatively, in the Guest Folio click on the Charges/Payments tab.
Click on the Payment button.
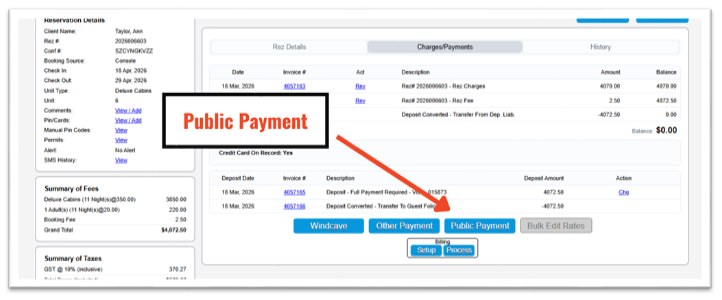
If you have a credit card processor selected, there will be three buttons; one for the credit card processor (Windcave, WorldPay or Stripe), the Other Payment button and Public Payment button.
Credit Card Processor Payment
Click on the credit card button. (Windcave, WorldPay or Stripe)
For New Credit Cards, select the card type from the dropdown.
(Windcave: Will automatically detect card type; no dropdown will display.)
For stored Credit Cards, select the card from the dropdown.
Adjust the Amount if required.
Click Proceed.
New cards: Enter the card details and proceed.
When the payment is successful, you can send a confirmation email and/or receipt to the customer or close the Print Selector box.
Other Payment i.e. EFTPOS or Cash
Select the payment method and adjust the Amount if required.
Click Post
Click Submit to finalise the payment.
To send a confirmation email and/or receipt to the customer, click on the Print Other button to select the required email/receipts etc.
Public Payment
Public Payment allows you to send a payment request link to the customer via Email (or SMS if module is enabled).
Click on the Public Payment button.
Adjust the amount requested, if required.
Click Submit.
Select Email to send out the Public Payment email with the link embed;
or select SMS to sms the Public Payment sms message with the link embed;
or select Copy to copy the public payment link to embed into another email or communication method.
When the customer has completed the payment, the booking balance will automatically update, and the customer will receive an automatic confirmation email. You will also receive an automatic payment confirmation email.
Making a Payment FAQs
Question: How do I change the payment type? I selected the wrong one.
Answer: Click on the Chg next to the payment and select the Change Payment Type option.
Select the correct payment type from the dropdown and click Submit to finalise.
Editing Reservation Charges
At any point prior to clicking Submit, when creating a booking or making a date, occupant, rate group or unit type change on a created booking, you can manually edit the new reservation charges for this specific booking.
Prior to clicking Submit, click on the Charges/Payments tab and you will see the option to Change (chg) the Tentative Rez Charges.
- Click Change.
- Edit the rates and label accordingly.
- Enter a comment to explain the reason for the manual adjustment.
- Click Close.
- Ensure all other aspects of the booking have been completed prior to clicking Submit to finalise.
After clicking Submit on a new booking or any change, the reservation charges can still be changed using a Sale transaction within the Guest Folio.
This sale transaction will display as an additional line in the Charges/Payments tab.
- Click Sale button at the top of the Guest Folio.
- Select Product Group: Reservation Charges
- Select Product Label: Select the unit type of the booking. (TIP: The Till Tape is displaying on the left side so you can view the unit type of the booking.)
- Quantity: This can be adjusted if required. Negative values are allowed.
- Price Per Unit: Enter the amount that needs to be added (or subtracted) from the balance.
This amount can be a positive or negative figure.
- Click anywhere on the screen to allow the system to calculate the tax associated with the product charge.
- Click Post.
- Within the Payments/Transfer section, leave the payment type as Guest Folio Transfer.
Editing Reservation Charges FAQs
Question: Why is the Change option not displaying when I click on the Charges/Payments tab?
Answer: The option to Change a tentative rez charge is only available prior to clicking Submit. If the Submit button has been pressed, the Change will not display in the Charges/Payments tab. The only option to edit the charges after pressing Submit is using the Large Sale button near the top.
Booking Scenarios
Changing Dates
Both the Check In and Check Out dates can be changed prior to Check In.
Once the booking has been checked in, only the Check Out date can be changed.
Once the booking has been checked out, neither dates can be changed.
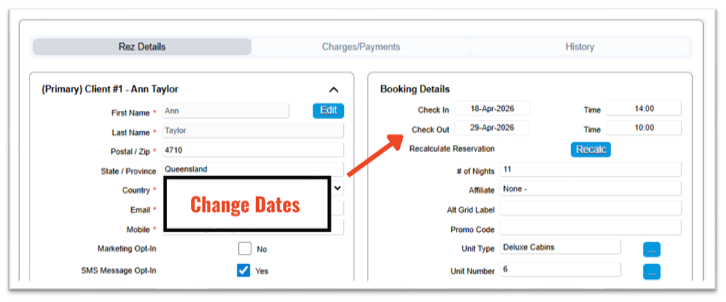
If the dates need to be changes, right click on the booking and select Guest Folio.
- Within the Booking Details on the right, adjust the Check In and/or Check Out date to the new requested dates.
The system will automatically calculate the new reservation charges (according to the rates table and settings); however if you need to manually edit the new reservation charges for this specific booking.
- If no rates need to edited, click Submit to finalise the new dates.
- Prior to clicking Submit, click on the Charges/Payments tab and you will see the option to Change (chg) the Tentative Rez Charges.
- Click Submit to finalise the new dates.
- Click on the Charges/Payments tab to process through the payment or refund.
- If the client needs a receipt or email etc., click Print Other to email/print the required content.
- Click Grid to return to the Availability Grid.
Changing Dates FAQs
Can I change the Check Out/Departure date after the booking has been checked in?
Yes, you can change the check out date. The system will automatically calculate the new reservation charges (according to your settings) for you to apply the payment/refund to the booking.
Changing Unit Types
The Unit Type assigned to the booking can be changed prior to the booking when the booking status is Confirmed.
After the booking has been checked in, the unit type can only be changed on the day of Check In.
Scenario: Customer wants to move their booking from Unit Type A to Unit Type B.
If the customer decides to change their unit type, you can make the adjustment by right clicking on the booking and select Guest Folio.
- Within the Booking Details on the right, click on the square box next to Unit Type and select the new unit type.
- You can also click on the square box next to Unit (right hand side of screen) to assign a unit number at this point, or you can leave the booking as Unassigned.
The system will automatically calculate the new reservation charges (according to the rates table and settings); however, if you need to manually edit the new reservation charges for this specific booking.
Prior to clicking Submit, click on the Charges/Payments tab, and you will see the option to Change (chg) the Tentative Rez Charges. Click Submit to finalise.
- If no rates need to edited, click Submit to finalise the unit type adjustment.
Changing Unit Types FAQs
Question: What do I do when the customer wants to change unit types after they have been checked in for a night or more?
Answer: The Unit Type can only be changed for Checked In bookings on the day of Check In. After a night has passed, the booking can be split and the second part of the booking moved to the new unit type.
Click on the Split button on the top of the Guest Folio. Select the date the customer is moving and click Submit. On the Booking #2, select the new unit type – review the reservation charges, and make any adjustments if necessary, prior to clicking Submit.
Changing Unit
Scenario: Customer wants to move their booking from Site 1 to Site 3, within the same Unit Type.
If the customer decides to change their unit, there are a couple of ways you can quickly do this.
- Left click on the booking and click on the Unit link to assign the unit.
- The available units will display for selection.
Unassigned will make the booking unassigned.
- Right click on the booking and select Move.
- You will be directed to the Guest Folio > Units box displaying the available units for selection.
Unassigned will make the booking unassigned.
- Right click on the booking and select Click To Move.
- Click on the available unit and date on the Grid.
- Click Proceed.
- You will be directed to the Guest Folio; click Submit to finalise.
Changing Unit #s FAQs
Question: The new unit isn’t displaying in the list to assign to this booking?
Answer: There is another booking already assigned to the requested Unit. On the Grid, locate the booking that is assigned and left click. Within the Till Tape, click on the link next to Unit and select Unassigned in the Unit List. Locate the original booking and you can now left click to view the Till Tape and repeat the process to assign the required unit.
Question: I want to quickly move bookings around; what way would you suggest?
Answer: Left click on the booking and within the Till Tape click on the
Cancelling a Booking
If a booking needs to be canceled, right click on the booking and select Cancel.
Note: Do not reverse any charges or payments; this will be automatically done in the cancellation procedure below.
- Within the Rez Status pop up box, select Cancel Rez.
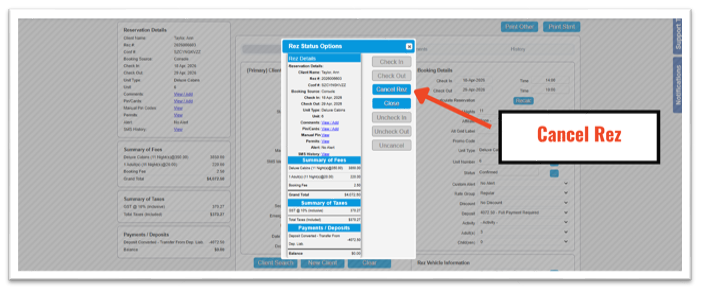
- You are now in the Reservation Cancellation box where you can handle the cancellation.
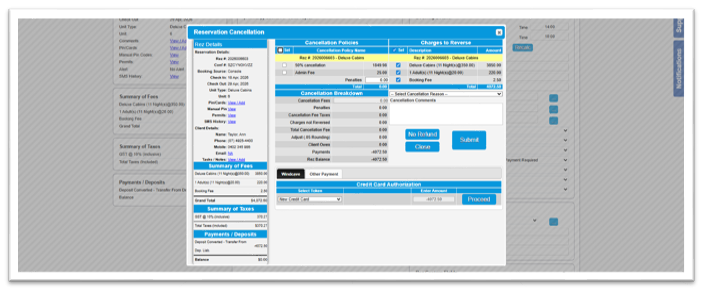
- (Top Left) Charging a Cancellation policy/fee: Tick on the required Cancellation policy
- (Middle Right) Select the Cancellation Reason: Click on the Cancellation Reason dropdown and select the appropriate reason, you can also add comments in the box below.
- If a payment or refund is due: Select the Other Payment tab and select the payment/refund method from the Settlement Type dropdown and click Post.
- If you do not want to provide a refund, select the No Refund button to retain the amount
- Click Submit to finalise.
- You can send a cancellation email to the customer or close the Print Selector box.
The booking is now canceled and will not display on the Availability Grid.
NOTE: The booking will be marked as canceled within the Client’s reservation history.
Pencil In/Maintenance Block Outs
Pencil Ins can be made on the Availability Grid to quickly reserve or block unit(s).
Maintenance Block outs can be made when the unit(s) is unavailable to be booked due to a maintenance issue.
On the Availability Grid, click on the date for unit. If it applies to multiple dates or units, drag down to highlight the required units and drag out for the required dates.
The Create Pencil In box will appear on top left of the Availability Grid.
Click Go.
To block out dates for Maintenance
Within the Create Pencil In box, select the Maintenance option.
Enter a note/comment into the Comments box; this text will display on the Availability Grid for the staff reference.
Click Submit to finalise.
The Maintenance pencil in successful message will display and the unit(s) will be blocked out on the Availability Grid for the date(s).
Maintenance block-outs remove the unit from any occupancy reporting
To reserve unit(s) for an unconfirmed Booking or unconfirmed group
Sometimes, you want to reserve unit(s) for a tentative booking that you will later confirm.
You can use the Regular option.
Within the Create Pencil In box, select the Regular option.
Enter a note/comment into the Comments box; this text will display on the Availability Grid for the staff reference.
Click Submit to finalise.
The Pencil in successful message will display and the unit(s) will be reserved on the Availability Grid for the date(s).
When the customer decides to confirm the dates, you can click on the pencil in and select Convert to convert it into a booking.
Pencil Ins are recorded as occupancy in the revenue and occupancy reporting
Managing Today's Check Outs
If the guest has come to the front desk and wishes to check out, you can right click on the booking and select Check Out.
You will also locate the booking within the Arrivals/Departures panel.
- Click on the In/Out button.
- Click on the Departures tab.
- Select the booking and click Check Out button.
This will direct you to the Guest Folio.
- Click Check Out.
- Click Grid button on the top right of the panel to return to the Grid.
Or, scroll up and expand the Arrivals/Departures panel if you wish to return to there.
Check out everyone that has departed today in one go.
- Click on the In/Out button.
- Click on the Departures tab.
- Click the Bulk Check Out button.
- Tick on the Sel All box to select all - only the reservations with a $0.00 will be selected.
- Click Submit and this will check out all the bookings.
Any reservations that have an outstanding balance will need to be paid off prior to checking out.
Paying off outstanding balances
- Select the reservation and click Payment button. This will direct you to the Charges/Payments tab of the booking with the credit card processor open.
- If paying by (previously used) credit card, click on the dropdown to select the credit card token.
- If paying by new credit card, click Proceed to enter in the details.
- If paying by another payment type, click the Cancel button at the top and click on the Other Payment button.
Select the payment type and click Post and Submit to finalise.
- Click Check Out button to check out the booking.
Managing Today’s Check Outs FAQs
Question: What do I do if I have checked out a booking accidentally?
Answer: Email or call RezExpert Support and we will be able to adjust the booking’s status back to Checked In.
Managing Today’s Check Ins
If you are seeing the booking on the Grid, right click on the booking and select Check In.
This will direct you to the Guest Folio with the Rez Status box displaying.
- You can assign a unit if the booking is unassigned, or assign a new unit if required.
Click Check In button.
You will also locate the booking within the Arrivals/Departures panel.
- Click on the In/Out button.
- Click on the Arrivals tab.
- Select the booking and click Check In button.
This will direct you to the Guest Folio.
- Click Check In.
- This will direct you to the Guest Folio with the Rez Status box displaying.
- You can assign a unit if the booking is unassigned, or assign a new unit if required.
- Click Check In button.
Managing Today’s Check Ins FAQs
Question: What do I do if I have checked in a booking and the customer wants to move units?
Answer: On the day of Check In, you can still change the Unit Type and Unit of the booking.
Open the Guest Folio and click on the box next to Unit Type and/or Unit to make the adjustment.
Question: What do I do if I have checked in a booking and the customer comes back and needs to cancel?
Answer: On the day of Check In, you can cancel the booking.
Open the Guest Folio and click on the box next to Rez Status and select Cancel Rez to proceed with the cancellation.
Question: What do I do if I have checked in a booking accidentally?
Answer: Email or call RezExpert Support and we will be able to adjust the booking’s status back to Confirmed.
Managing Yesterday’s Check Ins
Any booking that the staff haven't checked in will display in the Arrivals tab.
If you know that the customer has arrived and the staff didn’t check the booking in, you need to check in the booking in the Arrivals tab.
- Click on the In/Out button.
- Click on the Bulk Check In button.
- Select the bookings that you need to check in.
Any bookings that were No Shows can be left unselected and you can cancel them afterwards.
- Click Submit.
- This will have checked in all the bookings.
Searching Client Records
All of the client and business records can be found within the Search button on the Availability Grid.
- Click Search button
- If it is a business record, click on the Business tab.
- Enter in the Search criteria and click Search for view the results.
If you need to widen the search criteria, tick on the Any Part of Field flag at the bottom of the Search box prior to clicking Search.
- If more than one record matches the search criteria, they will display within the Results tab below.
Select the required record.
- If only record matches the search criteria, they will display as a Selected Client record on the top right corner of the Availability Grid.
You can select the Disable Auto Select Client flag prior to clicking Search to stop this and have the record display within the Results tab instead.
TIP: Client Name searches by Last Name first. Last Name, First Name.
Within the Selected Client box, the Client Name will display (Last Name, First Name) along with two buttons – Edit and History.
Edit Button: Will direct you to Details tab of Client Record to view/edit their client details.
History Button: Will direct you to the Reservation History tab, displaying their bookings.
Clicking on either button will direct you to the same client record, but land on a different tab within that record. You can click on the other tabs on the top to move within the record.
Clicking on the – in the circle on the top right of the Selected Client box will clear out Search selection.
Searching Client Records FAQs
Question: How do I get it to display Results so I select the record if there is only one record found?
Answer: Tick the Disable Auto Select Client flag before clicking Submit. The system will not automatically display the only record found as a Selected Client on the Grid, but instead display the record within the Results tab for you to select if required.
Question: Why are some records displaying as a different colour to others in the Results tab?
Answer: The client records displaying as a different colour indicate that that client is currently a guest – they have a checked in booking.
Client Records
The Client Editor panel contains all of the client’s details.
It contains four tabs – Details, Policy/Member Info, Reservation History, POS History.
Details tab
Contains all the client information i.e. First Name, Last Name etc.
Operators can make edits to any field within the Details tab.
Activate Accounts Receivable: Allows for an AR Account to be activated for the client/business.
Person Details
Partner information and Person Description can be entered. This information will not display in any other location.
Warning List
The warning list flag can be enabled and comments entered. This message will pop up when the client record is searched for alerting the staff of the entered comments.
A Warning List line will also display as yellow in the client’s Guest Folio of any of their bookings. Operators will be able to click on the Warning List Description link to view the message.
Membership Details
All clients will be classed as a Non Member.
If you have memberships, you can select the required membership type from the dropdown.
Membership Status: If the record is no longer valid, you can change the status from Active to Inactive.
TIP: You can ‘block’ people from booking by changing the status to Suspended. When you want to allow them to book again, change the status back to Active.
Policy/Member Info tab
Contains the date that the client became a new client record – as a Non-Member.
Any changes to their Membership Details will be automatically logged in the Policy/Member Info tab.
Any clients with AR Accounts will have their account history display.
Any clients with periodic billing policies will have their policy details display in the Billing Policy History.
This tab is a good way to quickly see the record history of the client.
Reservation History tab
Contains all the bookings belonging to the client.
You can select a booking and click Select to open the Guest Folio of the booking.
A Date Range and Search Criteria is available to narrow down the search for clients with a large number of bookings.
POS History tab
Contains all the POS transactions sold to the client.
Any POS transactions that were not transferred to a booking (paid off using a payment type i.e. Cash, Visa etc) will display first.
To view the POS transactions that were transferred to a booking, change the Include Transferred to Guest Folio from No to Yes.
The following tabs may also appear in the Client Record if that module has been enabled for the business.
Permits
Contains all permits sold to the client.
Rez Objects
Contains all Rez Objects that have been created for the client.
Arrivals/Departures Panel
The Arrivals/Departures panel displays all reservations according to their current status, for the date range displaying.
The panel is broken into 7 tabs – Arrivals, Departures, Registered, Pending, Cancelled, General, Pencil In.
- Arrivals: Reservations due to be checked in.
- Departures: Reservation due to be checked out.
- Registered: In House guests – Reservations currently checked in.
- Pending: Reservations with outstanding deposits.
They will remain in the Pending tab for 90 days from the date they are created.
- Cancelled: Reservations which have been cancelled.
- General: All reservations, for the date range selected, except for cancelled reservations.
- Pencil In: All Pencil ins and Maintenance pencil ins.
Each tab has different search filters and configurations at the bottom of the panel.
Selecting a booking will highlight the buttons at the top of the panel. You can select the button to be directed to that area within the booking.
The Search button will allow you to search for a particular booking or client. If a record is found for the date range selected, the results will display in the tab.
Arrivals/Departures Panel FAQs
Question: Why is the panel taking a long time to load?
Answer: When opening the Arrivals/Departures panel, you default to the Arrivals tab. If there are many outstanding past bookings that haven’t been checked in, the panel will take a long time to load.
Complete a Bulk Check In and Bulk Check Out of the $0.00 bookings to manage the past bookings.
This task may need to be completed a few times to clear out all past bookings.
Question: What is the date range limitation of the tabs in the Arrivals/Departures panel?
Answer: There is no date range limitation within the tabs. However, if there are many reservations for the date range and search criteria selected, the tab will take some time to load.
End of Day Cut-Off
Employee Staff End of Shift/Day cut offs should be performed at the end of each shift (when you normally require your staff to balance up their shifts takings etc) or if you only balance up once per day then do it at the end of the day.
The End of Shift function is an essential part of the program and performs a similar function to that of performing a Z-Read on a till. This key process ensures the integrity of your information and control over cash.
Failing to convert deposits (by leaving guests in the check-in panel) will throw the report out because not ALL data is present to report.
Prior to performing the End of Shift cut off, the All Payments – by Sort Order Report can be printed off to help with entered Payments. Click Reports from the Menu Bar – End of Day category.
Windcave / WorldPay / Stripe: It is important that you run the end of day settlement report within your credit card payment gateway to get their credit card totals.
- Scroll up to the top of the screen and click on the End of Day button and select Staff End of Shift.
This will allow staff to perform individual or business whole cut offs.
3. Cut Off Dates
Section 3. Cut-off Date(s) by User on the right will display when the cut off is up to.
- If it is for all payments up to Now, move to Section 1. Select Employees.
- If it is for all payments up to a specific past date/time, select Specify and specify the required date/time.
1.Select Employees
System is always selected when doing cut-offs. System handles all system payments such as AR Transfer, Deposit Transfer, Guest Folio Transfer, and Security Deposit Transfer.
To close a single Employee’s shift: Select the shift Employee and “System”.
To close off ALL employee(s): Tick on the Select All circle.
Click Continue button to enter in the payment totals.
2. Cash Drawer Count
In the 2. Cash Drawer column, enter the totals in the yellow count box.
- Count your till
- Type in the number of notes and/or coins you have in that denomination (not the dollar value). i.e. 3 X $1; 7 X $2
- Repeat this procedure, entering the number of notes/coins that you have for each denomination.
- Enter the actual dollar values of coins that you have in the Coin box.
- If you don’t require number of each denomination, you can enter the whole cash amount into the Coin box i.e. 314.
- Enter your Float amount (only enter the float if it is counted in your totals). The float will be deducted from the cash count.
Other Payment Type totals
In the yellow boxes next to the other payment types, enter the total dollar amount of each payment type.
If the payment type wasn’t used, leave the box blank.
NOTE: The Cash amount entered automatically contains the figure from the Total Cash box on the left.
Click Process button.
The system will now display the totals for each payment type of all transactions being cut-off.
After processing, if there is a number other than $0.00 in the Difference column, you must reconcile this difference prior to clicking Submit to finalise the cutoff.
The program displays detailed entries for the day to help you find the differences.
View Reconciling End of Day steps.
If everything balances, click Submit button to finalise the End of Day Cutoff.
Printing the Report
After finalising the Cut off, click the Print button to print off the End Of Day – Cut Off Review.
Reconciling End of Day
Click on the Reconcile tab to view all the payments.
NOTE: You can narrow the view to a specific payment type only by clicking on the Payment Type dropdown at the top of the screen.
Locate and note any errors.
- If it is a typo, you can enter the difference into the Adjustment column next to the Payment Type.
- If it is an incorrect payment, you can fix these within the booking’s Guest Folio or with a POS transaction.
Note the Guest Name(s) and Reservation #s.